VexRiscv: A 32-bit RISC-V Microcontroller
I. VexRiscv CPU
VexRiscv CPU is a 5-stage 32-bit RISC-V CPU.
The ISA that VexRiscv is using is rv32i for the SmallestGen, rv32im for GenFull, and rv32ima for LinuxGen.
Original repository. Modified repository.
I. a) Make & self-test
First, git clone the folder:
$ git clone https://github.com/thuchoang90/VexRiscv.git
$ cd VexRiscv/
$ git submodule update --init --recursive
VexRiscv CPU has many build options:
$ cd VexRiscv/    #go to your VexRiscv folder

for smallest CPU:
$ sbt "runMain vexriscv.demo.GenSmallest"

for GenFull CPU:
$ sbt "runMain vexriscv.demo.GenFull"

for Linux CPU:
$ sbt "runMain vexriscv.demo.LinuxGen"
Self-test using Verilator:
$ cd VexRiscv/    #go to your VexRiscv folder
$ cd src/test/cpp/regression/

for GenSmallest:
$ make clean run IBUS=SIMPLE DBUS=SIMPLE CSR=no MMU=no DEBUG_PLUGIN=no MUL=no DIV=no

for GenFull:
$ make clean run

for LinuxGen:
$ make clean run IBUS=CACHED DBUS=CACHED DEBUG_PLUGIN=STD DHRYSTONE=yes SUPERVISOR=yes MMU=yes CSR=yes DEBUG_PLUGIN=no COMPRESSED=no MUL=yes DIV=yes LRSC=yes AMO=yes REDO=10 TRACE=no COREMARK=yes LINUX_REGRESSION=yes
I. b) SpinalHDL source-code library
VexRiscv CPUs are constructed based on the SpinalHDL library. Reference link.
Actually, this library is downloaded and embedded into the system automatically while we are generating CPUs at those steps above. However, because it is hard to navigate the sources in an embedded library, it is recommended to git clone the library again in a separated folder for more accessible to search for the library source codes.
$ git clone https://github.com/SpinalHDL/SpinalHDL.git    #branch master commit 647e8974 on 27-Mar-2020
$ cd SpinalHDL/
$ git submodule update --init --recursive
  #the library source-code are under the folder: lib/src/main/scala/spinal/lib/
I. c) VexRiscv’s OpenOCD
OpenOCD tool that custom-made by the SpinalHDL group for this VexRiscv CPU. (the generic OpenOCD tool in the Fresh-Ubuntu-setup won’t work)
$ git clone https://github.com/SpinalHDL/openocd_riscv.git vexriscv-openocd
  #branch riscv_spinal commit 92c05420 on 13-Mar-2020
$ cd vexriscv-openocd/
$ git submodule update --init --recursive
$ ./bootstrap
$ ./configure --enable-ftdi --enable-dummy
$ make
I. d) Debug GenFull CPU with Verilator + OpenOCD + GDB
Open three terminals separately: one for Verilator, one for OpenOCD, and one for GDB. On the first terminal, run Verilator:
$ cd VexRiscv/                          #go to your VexRiscv folder
$ sbt "runMain vexriscv.demo.GenFull"   #make sure that GenFull is generated
$ cd src/test/cpp/regression/
$ make clean run DEBUG_PLUGIN_EXTERNAL=yes
On the second terminal, run OpenOCD:
$ cd vexriscv_openocd/    #go to your vexriscv_openocd folder
$ src/openocd -c "set VEXRISCV_YAML <cpu0.yaml PATH>" -f tcl/target/vexriscv_sim.cfg
  where <cpu0.yaml PATH> point to the file cpu0.yaml in the VexRiscv folder
  For example:
  $ src/openocd -c "set VEXRISCV_YAML /home/ubuntu/Projects/VexRiscv/cpu0.yaml" -f tcl/target/vexriscv_sim.cfg
Finally, on the third terminal, run GDB:
$ echo $PATH                              #check that if the riscv toolchain is on the PATH or not
$ export PATH=/opt/riscv/bin/:$PATH       #if not, then export the riscv toolchain to the PATH

$ cd VexRiscv/                            #go to your VexRiscv folder
$ riscv64-unknown-elf-gdb src/test/resources/elf/uart.elf   #run the software with gdb tool
$ target extended-remote localhost:3333   #connect to the hardware (right now is emulated by verilator)
$ monitor reset halt
$ load
$ continue                                #after this, it should prints messages to the Verilator terminal
II. Briey SoC
Briey SoC is a system consists of GenFull CPU + AXI bus + device modules (RAM, UART, GPIO, etc).
II. a) Briey SoC software demo
Sample sofwares for Briey SoC can be found at: github.com/thuchoang90/briey_software
First, clone the Briey SoC software demo to your local machine.
$ git clone https://github.com/thuchoang90/briey_software.git
This contains the first test demo under the test/ folder, and some other example demos, including chip demos.
II. b) Debug Briey SoC with Verilator + OpenOCD + GDB
The Verilator emulates the Briey SoC. If you are using FPGA (or chip), then the real hardware will replace the Verilator. But the running scheme stays the same.
The OpenOCD makes the bridge between hardware and software: the vexriscv_openocd/ prepared in I.c) VexRiscv’s OpenOCD).
The GDB is a native tool of the toolchain for debugging the hardware. The GDB can be replaced by other debugging tools such as Eclipse.
To debug the Briey SoC with Verilator + OpenOCD + GDB:
First, run the Verilator:
$ cd VexRiscv/                            #cd to your VexRiscv folder
$ sbt "runMain vexriscv.demo.Briey"       #make sure that Briey SoC is generated
$ cd src/test/cpp/briey/
$ make clean run

Keep the Verilator terminal running, open a second terminal to run OpenOCD:
$ cd vexriscv_openocd/                    #cd to your vexriscv_openocd folder
$ src/openocd -f tcl/interface/jtag_tcp.cfg -c "set BRIEY_CPU0_YAML <cpu0.yaml PATH>" -f tcl/target/briey.cfg
  where <cpu0.yaml PATH> point to the file cpu0.yaml in the VexRiscv folder
  For example:
  $ src/openocd -f tcl/interface/jtag_tcp.cfg -c "set BRIEY_CPU0_YAML /home/ubuntu/Projects/VexRiscv/cpu0.yaml" -f tcl/target/briey.cfg

Keep both Verilator and OpenOCD terminals running, open a third terminal to run GDB:
$ cd briey_software/                      #cd to your briey_software/ folder
$ echo ${PATH}                            #check that if the riscv toolchain is on the PATH or not
$ export PATH=/opt/riscv/bin:$PATH        #if not, then export the riscv toolchain to the PATH
$ riscv64-unknown-elf-gdb test/build/briey.elf
$ target extended-remote localhost:3333
$ monitor reset halt
$ load
$ continue                                #after this, it should print messages in the Verilator terminal
II. c) Debug with Eclipse
Same procedure as II. b) Debug Briey SoC with Verilator + OpenOCD + GDB with three separated terminals. Just replace the GDB-terminal step with this Eclipse step: the Eclipse tool prepared in Fresh-Ubuntu-setup.
Open the Eclipse tool, then import the example software folder:
1. File --> Import... --> C/C++ --> Existing Code as Makefile Project --> Next >
2. Browse to the software folder (briey_software/test/ for example)
3. Choose the "Cross GCC" (NOT the "RISC-V Cross GCC")
4. Choose the project name as you wanted, then click Finish
After imported, remember to check the file resources/gcc.mk for the RISCV_PATH variable for the correct path of your riscv toolchain.
To debug the program:
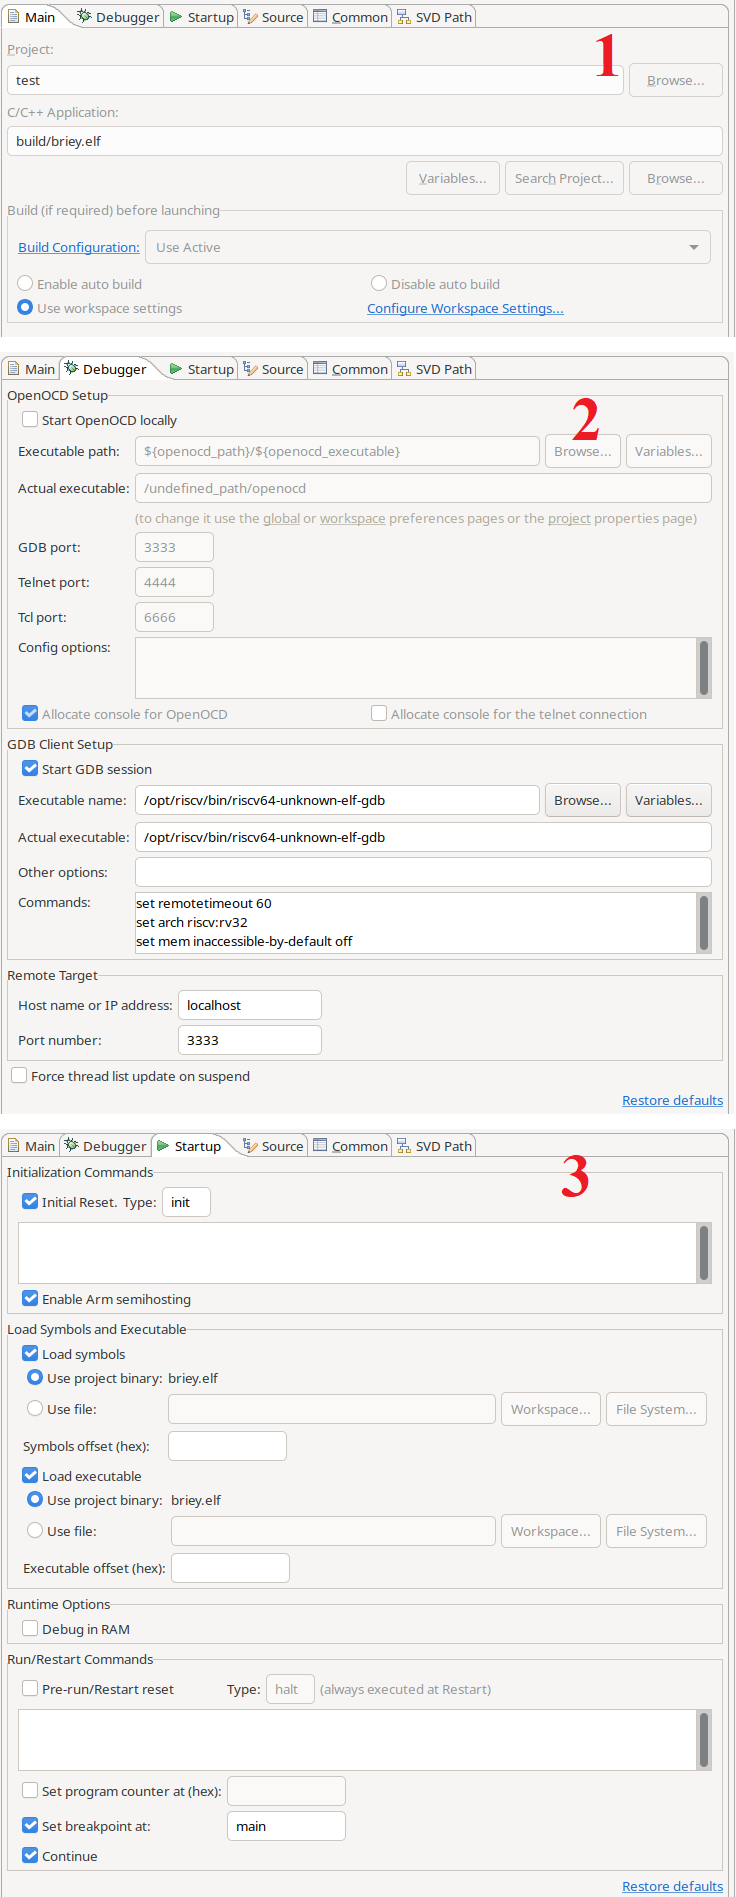
1. Right click on the software project --> Debug As --> Debug Configurations...
2. Choose the "GDB OpenOCD Debugging", then choose your debug configurations to debug
note: if not yet config your Debug Configurations, then double-click on the “GDB OpenOCD Debugging” and follow these images to config it.
(on the image number 2, remember to check the correct path for the riscv toolchain)
II. d) Run on FPGA
Same procedure as II. b) Debug Briey SoC with Verilator + OpenOCD + GDB with three separated terminals. Just replace the Verilator-terminal step with a real hardware on an FPGA.
There are several FPGA demos available: (click to the link to download the corresponding Quartus project folder)
All of the demos above are based on the Briey SoC with some modifications to fit in the corresponding FPGA.
Details about JTAG & UART connections of each demo are in the file README.md in each of the corresponding folder. Example Eclipse projects are also included in the links.
(i) About the JTAG debugger
The demos use the Olimex debugger. Reference link.
To install the driver for the debugger:
$ sudo vi /etc/udev/rules.d/olimex-arm-usb-tiny-h.rules
Then add this single line in the olimex-arm-usb-tiny-h.rules file:
SUBSYSTEM=="usb", ACTION=="add", ATTRS{idProduct}=="002a", ATTRS{idVendor}=="15ba", MODE="664", GROUP="plugdev"
(ii) Run a demo step-by-step
- Download the corresponding Quartus project folder in the links above and program your FPGA board.
- Make sure that you have connected the JTAG & UART to the FPGA board with correct connections as written in the README.md file.
-
Create OpenOCD terminal: the
vexriscv_openocd/folder prepared in I.c) VexRiscv’s OpenOCD.$ cd vexriscv_openocd/ #cd to your vexriscv_openocd folder $ src/openocd -f tcl/interface/ftdi/olimex-arm-usb-tiny-h.cfg -c "set BRIEY_CPU0_YAML <cpu0.yaml PATH>" -f tcl/target/briey.cfg where <cpu0.yaml PATH> point to the file cpu0.yaml in the VexRiscv folder For example: $ src/openocd -f tcl/interface/ftdi/olimex-arm-usb-tiny-h.cfg -c "set BRIEY_CPU0_YAML /home/ubuntu/Projects/VexRiscv/cpu0.yaml" -f tcl/target/briey.cfg -
Create UART terminal: (open a new one, don’t close the OpenOCD terminal)
$ sudo minicom -b 115200 -D /dev/ttyUSBx where x is the number of connected USB-UART device For example: $ sudo minicom -b 115200 -D /dev/ttyUSB0 - Run or debug software (by GDB or Eclipse)
- Using GDB: (open a new one, don’t close the two terminals of OpenOCD & UART)
 $ echo ${PATH}                            #check that if the riscv toolchain is on the PATH or not
 $ export PATH=/opt/riscv/bin:$PATH        #if not, then export the riscv toolchain to the PATH

 $ cd software/                            #go to the software folder inside the Quartus project folder
 $ riscv64-unknown-elf-gdb build/briey.elf
 $ target extended-remote localhost:3333
 $ monitor reset halt
 $ load
 $ continue                                #after this, it should print messages on the UART terminal
- Using Eclipse: the same as II. c) Debug with Eclipse
(iii) Note to update software with changed hardware
The software folders in the links above were already synced up with their corresponding hardwares outside.
So, if you change the hardware properties, you will have to change the software as well. To be specific, mind the libs/briey.h file for addresses and libs/briey.ld for linker.
(iv) Note for chip demo
For SOTB chip fabricated in Aug. 2019:
-
Software demos: SOTB_Aug2019_* folders at github.com/thuchoang90/briey_software
-
Hardware source: src/main/scala/vexriscv/demo/Briey_SOTB_Aug2019.scala file at github.com/thuchoang90/VexRiscv/tree/dev-chip
For ROHM chip fabricated in Jan. 2020:
-
Software demos: ROHM_Jan2020_* folders at github.com/thuchoang90/briey_software
-
Hardware sources: src/main/scala/vexriscv/demo/Briey_ROHM_Jan2020.scala file at github.com/thuchoang90/VexRiscv/tree/dev-chip